Update on the state of STARTTLS support of Greek email providers

2 months ago I wrote a blog post describing the really bad state of STARTTLS support of Greek email providers. Things have slightly gotten better since then.

Updates on STARTTLS support per provider
The following is current as of 2016/03/26 and are only the updates since the previous blog post.
FORTHNET: Supports TLS 1.2 (at least since 2016/02/03)
VODAFONE: Supports TLS 1.2 for vodafone.gr but NOT for vodafone.com.gr (at least since 2016/03/10)

Updates on Certificate status per provider (that have STARTTLS support)
FORTHNET: uses a valid certificate (a wildcard *.forthnet.gr)
VODAFONE: uses a valid certificate (a wildcard *.megamailservers.eu)
MAILBOX: uses a valid signed certificate (for spamexperts.eu) (at least since 2016/03/26)

No other changes have been observed.

These updates indicate that 3 out of 5 commercial Greek ISPs currently use STARTTLS on their mail servers, OTE/COSMOTE, Forthnet and Vodafone. Way better than 1 out 5 which was the case 2 months ago. That means that the only ones left behind are Wind and Cyta, Since HOL has merged with Vodafone.

P.S. Thanks fly to @stsimb for notifying me of Forthnet updates with a comment on my blog

The sorry state of STARTTLS support of Greek email providers

I started looking into the STARTTLS support of Greek email providers completely by accident when one email of mine wasn’t being delivered for some reason to a friend who has an email address at a traditional Greek ISP. I started looking into the delivery issues by running swaks against the email server of the ISP and I just couldn’t believe it that the ISP’s mail server response did not include STARTTLS support. That made me wonder about the rest of the ISPs, so I created a very simple script that takes domains, finds their MX addresses and performs very simple TLS lookups using openssl. Yeah I know that there are websites that track the STARTTLS support of mail servers, but they usually don’t save the previous results and you can’t grep and compare.

What I’ve looked into is how emails are sent between servers (SMTP), not if users can read emails from the mail servers (POP3/IMAP) using encrypted connections.

TL;DR
The situation is BAD, REALLY BAD. Only 1,5 (yes, this is one and a half) commercial ISPs supports STARTTLS. OTE/COSMOTE has “proper” STARTTLS support while Wind has STARTTLS support only for windtools.gr domain, but not for their wind.gr.

I couldn’t believe the situation was SO, SO BAD before looking at the results. It seems that I had a lot more faith in those providers than I should have. Yeah I was wrong once again.

wtf is STARTTLS?
(please don’t read the next sentence if you know what TLS is)
If you have no idea about TLS and STARTTLS, then consider STARTTLS a way for servers to communicate and exchange data in encrypted form instead of cleartext. If mail servers don’t support STARTTLS then other servers can’t send them emails in encrypted form and everyone between those 2 servers can read the emails. It’s the equivalent of “https://” for mail servers. (There, I said it…).

TLS support per provider
The following is current as of 2016/01/23

Commercial Providers
OTE/COSMOTE: Some servers support TLS version 1.0 and some others 1.2 (more on that later)
WIND: Supports TLS version 1.0 on windtools.gr but does NOT support TLS on wind.gr (different mail servers)
CYTA: Does NOT support TLS on their mail servers
FORTHNET: Does NOT support TLS on their mail servers
HOL: Does NOT support TLS on their mail servers
VODAFONE: Does NOT support TLS on their mail servers

non-Commercial Providers
GRNET: Supports TLS 1.2
SCH: Supports TLS 1.0
TEE: Does NOT support TLS on their mail servers
MIL: Supports TLS 1.0

Universities
AUTH: Supports TLS 1.2
NTUA: Some servers support TLS 1.0 and one supports TLS 1.2
UPATRAS: Supports TLS 1.0

Free Providers
IN: Does NOT support TLS on their mail servers
FREEMAIL: Does NOT support TLS on their mail servers
MAILBOX: Supports TLS 1.2

Radical Providers
ESPIV: Supports TLS 1.2

Certificate status per provider (that have STARTTLS support)
OTE/COSMOTE: *.otenet.gr mail servers, which are the ones that support TLS 1.0, use a certificate that is valid for mailgate.otenet.gr, *.ote.gr mail servers have their own certificates, but all mail*.dt-one.com mail servers, which are the ones that use TLS 1.2, use the same self-signed certificate.
WIND: mx2.windtools.gr uses a valid certificate
GRNET: uses a valid certificate
SCH: uses a self-signed certificate (which has expired 5 years ago) signed by their own CA (which has expired 4 years ago)
MIL: uses a self-signed certificate (which has expired 1 year ago) signed by their own CA
AUTH: uses a certificate signed by their own CA called HARICA, whose certificate is now included in modern OSes, so I will consider this a valid certificate.
NTUA: all mail servers use a certificate that is valid for mail.ntua.gr
UPATRAS: uses a valid certificate
MAILBOX: uses a self-signed certificate (by plesk)
ESPIV: uses a valid certificate (a wildcard *.espiv.net)

Why does it matter
It makes a huge difference for users’ privacy. If a mail server does not support STARTTLS then anyone with the ability to look into packets traveling on the net from a source mail server to the destination mail server can read the emails in pure plaintext, as you read them on your mail client. Support of STARTTLS for a mail server forces an adversary that previously just passively monitored traffic to have to start a MITM (Man in the middle) attack in order to read those same emails. This converts the adversary from a passive to an active attacker. And this is both expensive and dangerous for the adversary, it can get caught in the act.

Security and privacy-minded people might start bashing me on my next proposal, but considering the current situation I think it’s OK for most of the users of those providers that don’t support TLS at all.
Dear providers, please install a certificate, even a self-signed one, and add support for STARTTLS on your mail servers today.

Even a self-signed certificate improves this situation. And it costs absolutely nothing. There’s really no excuse to not even have a self-signed certificate for your email server.

Self-signed vs CA-Signed
Truth is that it 99.9999% of email servers on the Internet do not verify the remote end’s certificate upon communication. That means that it makes absolutely no difference in most cases whether the certificate is CA-signed or self-signed. Most modern email servers support fingerprint verification for remote servers’ certificates but this can’t obviously scale on the Internet. If a user fears that some entity could MITM their email provider just to read their email, they already have bigger problems and certificate verification would not be able to help them a lot anyway. They either need to protect the contents of their email (gpg?) or start using alternate means of messaging/communication (pond?)

script
The script I used is on github: gr-mx. Feel free to make changes and send pull requests.
I plan to run the script once a week just to keep an archive of the results and be able to track and compare. Let’s see if something changes…

Various weirdness
* windtools.gr has 2 MX records, mx1.windtools.gr and mx2.windtools.gr. mx1.windtools.gr has been unreachable since I started running the script on 2016/01/08.
* mail{5,6,7,8}.dt-one.com mailservers used by OTE/COSMOTE did not have the self-signed certificate on 2016/01/08 while mail{1,2,3,4}.dt-one.com had it. The certificate was added at some point between 2016/01/11 and 2016/01/17

Bypassing censorship devices by obfuscating your traffic using obfsproxy

*WARNING* 14/01/2014 This post is quite deprecated. For example obfsproxy has been completely rewritten in python and there is a newer and more secure replacement of obfs2, named obfs3. Please read this obfsproxy-debian-instructions for any updates.

Some countries like China, Iran, Ethiopia, Kazakhstan and others, like installing some nasty little boxes at the edges of their country’s “internet feed” to monitor and filter traffic. These little boxes are called DPI (Deep Packet Inspection) boxes and what they do, is sniff out every little packet flowing through them to find specific patterns and then they provide their administrator with the option to block traffic that matches these patterns. These boxes are very sophisticated and they don’t just filter traffic by src, dst or port, they filter traffic by the content (payload) the packets carry.
Unfortunately, it’s not just these countries that deploy DPI technologies, but some private companies also use such devices in order to monitor their employees.

The 10 thousand feet view
Tor is a nice way to avoid basic censorship technologies, but sometimes DPI technology is so good that it can fingerprint Tor traffic, which is already encrypted, and block it. In response to that, Tor people devised a technology called Pluggable Transports whose job is to obfuscate traffic in various ways so that it looks like something different than it actually is. For example it can make Tor traffic look like a skype call using SkypeMorph or one can use Obfsproxy to obfuscate traffic to look like…nothing, or at least nothing easily recognizable. What’s cool about obfsproxy though is that one can even use it separately from Tor, to obfuscate any connection he needs to.

A warning
Even though obfsproxy encrypts traffic and makes it look completely random, it’s not a fool proof solution for everything. It’s basic job is to defend against DPI that can recognize/fingerprint TLS connections. If someone has the resources he could potentially train his DPI box to “speak” the obfsproxy protocol and eventually decrypt the obfuscated traffic. What this means is that obfsproxy should not be used as a single means of protection and it should just be used as a wrapper _around_ already encrypted SSL traffic.
If you’re still in doubt about what can obfsproxy protect you from and from what it can’t, please read the Obfsproxy Threat Model document.

Two use cases
Obfuscate an SSH and an OpenVPN connection.
Obviously one needs a server outside the censorship perimeter that he or someone else will run the obfsproxy server part. Instructions on installing obfsproxy on Debian/Ubuntu are given in my previous blog post setting up tor + obfsproxy + brdgrd to fight censhorship. Installing netcat, the openbsd version; package name is netcat-openbsd on Debian/Ubuntu, is also needed for the SSH example.

What both examples do is obfuscate a TLS connection through an obfsproxy server so that it looks innocent. Assuming that the most innocent looking traffic is HTTP, try running the obfsproxy server part on port 80.
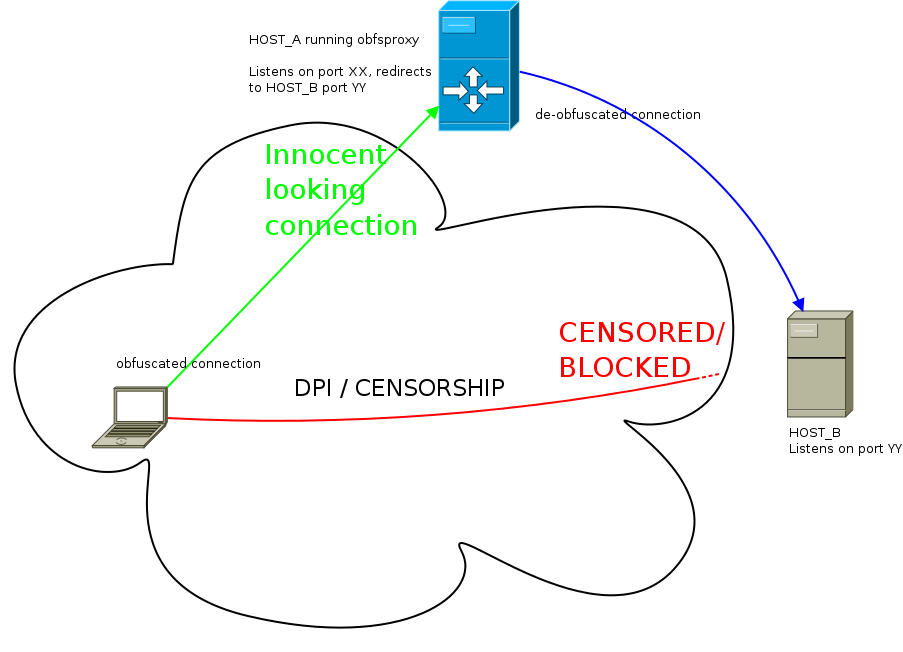
SSH connection
Scenario:
USER: running ssh client
HOST_A (obfsproxy): running obfsproxy on port 80 and redirecting to HOST_B port 22
HOST_B (dst): Running SSH server on port 22

What one needs to do is setup the following “tunneling”:
ssh client —> [NC SOCKS PROXY] —> obfsproxy client (USER)—> obfsproxy server (HOST_A) —> ssh server (HOST_B)

Steps:
1. on HOST_A setup obfsproxy server to listen for connection and redirect to HOST_B:
# screen obfsproxy --log-min-severity=info obfs2 --dest=HOST_B:22 server 0.0.0.0:80

2. on USER’s box, then configure obfsproxy client to setup a local socks proxy that will obfuscate all traffic passing through it:
$ screen obfsproxy --log-min-severity=info obfs2 socks 127.0.0.1:9999
Then instead of SSH-ing directly to HOST_B, the user has to ssh to HOST_A port 80 (where obfsproxy server is listening).

3. on USER’s box again, edit ~/.ssh/config and add something along the following lines:

Host HOST_A
    ProxyCommand /bin/nc.openbsd -x 127.0.0.1:9999 %h %p

This will force all SSH connections to HOST_A to pass through the local (obfsproxy) socks server listening on 127.0.0.1:9999

4. Finally run the ssh command:
$ ssh -p 80 username@HOST_A

That’s it. The connection will now pass get obfuscated locally, pass through obfsproxy server at HOST_A and then finally reach it’s destination at HOST_B.

OpenVPN connection
Scenario:
USER: running OpenVPN client
HOST_A (obfsproxy): running obfsproxy on port 80 and redirecting to HOST_B TCP port 443
HOST_B (dst): Running OpenVPN server on port 443

What one needs to do is setup the following “tunneling”:
openvpn client —> obfsproxy client (USER)—> obfsproxy server (HOST_A) —> OpenVPN server (HOST_B)

Steps:
1. on HOST_A setup obfsproxy server to listen for connection and redirect to HOST_B:
# screen obfsproxy --log-min-severity=info obfs2 --dest=HOST_B:443 server 0.0.0.0:80

2. on USER’s box, then configure obfsproxy client to setup a local socks proxy that will obfuscate all traffic passing through it:
$ screen obfsproxy --log-min-severity=info obfs2 socks 127.0.0.1:9999
Then instead of connecting the OpenVPN client directly to HOST_B, the user has edit OpenVPN config file to connect to HOST_A port 80 (where obfsproxy server is listening).

3. on USER’s box again, edit your openvpn config file, change the ‘port’ and ‘remote’ lines and add a ‘socks-proxy’ one:

port 80
remote HOST_A
socks-proxy 127.0.0.1 9999

This will instruct the OpenVPN client to connect to HOST_A passing through the local (obfsproxy) socks server listening on 127.0.0.1:9999

4. Finally run the openvpn client command:
$ openvpn client.config

That’s it.

Security Enhancement
You can “enhance” obfproxy’s security by adding a shared secret parameter to command line, so anyone who doesn’t have this secret key won’t be able to use the obfsproxy server, decryption of packets will fail:
# screen obfsproxy --log-min-severity=info obfs2 --shared-secret="foobarfoo" --dest=HOST_B:443 server 0.0.0.0:80
$ screen obfsproxy --log-min-severity=info obfs2 --shared-secret="foobarfoo" socks 127.0.0.1:9999

Documentation
Or at least…some documentation.

Your best chance to understand the internals of obfsproxy is to read the protocol specification

For more info about obfsproxy client part, read the documentation here: obfsproxy client external
For more info about obfsproxy server part, read the documentation here: obfsproxy server external

Screenshots
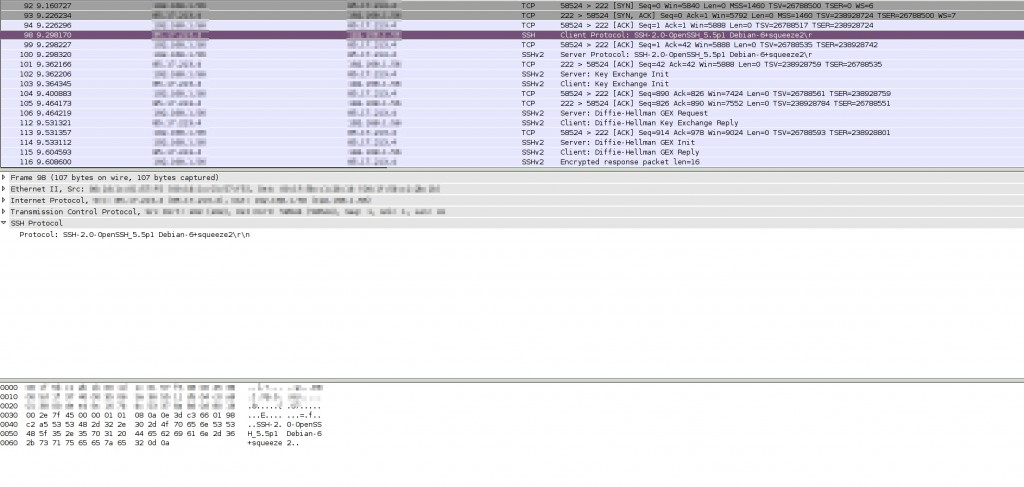
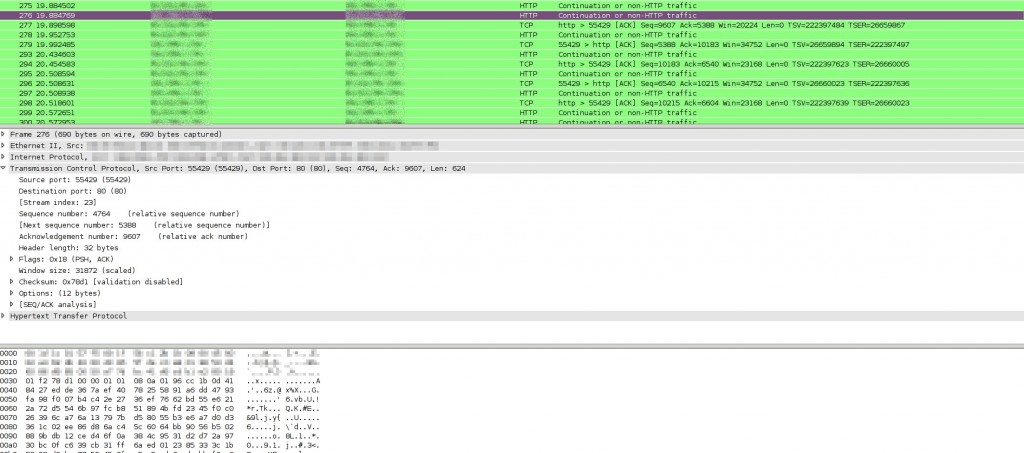
For those who like meaningless screenshots, here’s what wireshark (which is certainly NOT a DPI) can tell about a connection without and with obfsproxy:

Without obfsproxy
With obfsproxy
*Update*
one can find openvpn configuration files for use with obfsproxy here:
Linux Client
Windows Client

Greek rules for HTTPS Everywhere

HTTPS Everywhere is a browser addon by EFF whose job is to redirect you to the HTTPS versions of certain, whitelisted, web sites. What this means is that HTTPS Everywhere protects your communication with those websites by forcing them to be encrypted.

The current HTTPS Everywhere ruleset lacks any Greek websites, so I started yet-another-list to create rules for Greek websites. This is the fourth list I’m maintaing after GrRBL, Greek Spammers Blacklist and Greek AdblockPlus Filter rules and it is the only one where being included is actually a good thing.

You can find some more info about Greek rules for HTTPS Everywhere on my github page.

Until the rules get adopted upstream by HTTPS Everywhere team, in order to use them you should download the rules and place them inside your Firefox profile directory. But first of all you need to install the plugin/extension/addon/call-me-whatever-you-want by going to HTTPS Everywhere page.

Step 1: Instructions for Linux users
Go to the HTTPSEverywhereUserRules directory inside your firefox profile directory:

$ cd .mozilla/firefox/XYZXYZXYZ.default/HTTPSEverywhereUserRules/
(XYZXYZXYZ will be different in your machine)

and download the current Greek ruleset:
$ wget https://raw.github.com/kargig/https-everywhere-greek-rules/master/Greek.xml

Step 1: Instructions for Windows users
Download https://raw.github.com/kargig/https-everywhere-greek-rules/master/Greek.xml with your favorite browser.
Then, according to this Mozilla support page, open Fifefox, go to Help->Troubleshooting Information and under the Application Basics section, click on Open Containing Folder. There a window will appear and you should copy the previously downloaded Greek.xml file inside the HTTPSEverywhereUserRules folder.

Step 2: Instructions for any OS
Either restart your browser to load the new rules or click the HTTPS Everywhere icon beside the url bar, select “Disable HTTPS Everywhere”, then click it again and select “Enable HTTPS Everywhere”. The new rules should now be loaded, you can test by going to http://void.gr and it should immediately redirect you to https://void.gr

Some notes
The ruleset is experimental. If you find any problems please report them as issues to github.
If you want a Greek website added to the list, either report it as a new issue on github or fork the repository, add your own rules and open a pull request.

A small rant
I found some webmails in Greece that don’t even offer HTTPS as an option to the user. They ‘POST’ user details, including passwords of course, over unencrypted HTTP connections. I will be updating a text file called hallofshame.txt inside the github reposity of Greek rules for HTTPS Everywhere with such websites. I am planning to inform the operators of such websites every now and then, so if you know any other cases please open up new issues so we can help protect innocent users.

A big rant on current HTTPS status of top Greek websites
The status of HTTPS support on top 100 Greek websites (according to Alexa) is SAD. No wait, it is EXTEMELY SAD. Out of these 100 websites, taking into account only the ones that are actually run by Greeks, that means excluding Google, Facebook, Youtube, LinkedIn, etc, only 2, yes you read correctly, just two websites offer HTTPS support.
The reason 95% the others don’t is probably because they are based on Akamai-zed services and either don’t have the money to buy Akamai’s HTTPS products or don’t have the technical skills to do it properly.

If you don’t run an Akamai-zed website and want a completely free 1-year SSL certificate please visit https://www.startssl.com/. If you need professional help with your setup please don’t hesitate to contact.

There’s a very good (financial) explanation why these high traffic Greek sites have prefered Akamai’s services and haven’t deployed their own servers in Greece but this will be the content of another blog post coming soon.